News

Featured

Where to buy…

It has certainly been a challenging time for a micro business such as vRetro Design to try and navigate the various import rule changes in Europe and the UK over the past 9 months. We’re too small to justify directly selling to the EU due to the punitive compliance charges and handling VAT for the UK has added yet more work.

I have found no single solution so far and so, for customers, where you buy online will depend on your geographical location. vRetro Design now has an online shop which specifically caters for the EU and another which handles the rest of the world.

VAT collection at checkout, for those countries that require it, is now supported by both these shops leading to more transparency for import taxes and duty as well as a more hassle free import process.

If you’re in the EU then please visit : https://www.etsy.com/shop/vRetroDesign

Otherwise please visit :https://www.vretrodesign.com

I still sell on Tindie, but please be aware that VAT/GST is not collected at checkout (the main reason why I’ll be dropping Tindie soon) and further costs may be applied at the border.

Gate Array replacement for the Amstrad CPC range of computers now available

As hinted at in my previous post (and guessed by a few followers!) , a replacement for the 40010 gate array used in the Amstrad CPC range of computers is now available from my online shop (https://vretrodesign.com) .

Designated the VR40010, its features include:

– Plugin replacement.
– Low profile 40 pin DIL footprint.
– Provides the same functionality as the original Amstrad 40010 GA.
– Tested with an extensive suite of Amstrad CPC software including demos.
– Compatible with interfaces such as the Duke’s M4 and Zaxon’s DDI-4.
– Full 5V TTL IO interface.
– Low power consumption.

Whether you want to get a faulty Amstrad CPC back up and running, need a gate array replacement for a new clone, or just want to preserve your original 40010 then the VR40010 is exactly what you need.

Acknowledgements: Thanks to ‘Gerald’ of CPCWiki fame who reverse engineeered the 40010 Gate array in the first place and generously provided his findings to the CPC community. 

Also available very soon is the VR40007 which is a replacement for the 40007 gate array used in early Amstrad CPC464 computers. The pinout is different but functionality is the same.

New Products (and more to come!)

I’m pleased to annouce two new products. 

First up is a fully functional plug-in replacement for the AY-3-8912 programmable sound chip – the AY-3-8912-AVR.

As well as fully emulating the original sound characteristics (check out the audio sample on the product page), this version also provides support for the 8 bit bidirectional IO port.

In the Sinclair 128K computers the IO port provides two serial ports, one for RS232 and the other for the exernal calculator keyboard. For the Amstrad CPC range of computers the IO port manages the keyboard and joystick so is absolutely essential!

Also available is a version (the AY-3-8912A-TS) which supports Turbo Sound for the Sinclair 128K computers. This provides a total of 6 channels of tone + 2 noise channels. The AY-3-8912A-TS has the same pinout as an original AY-3-8912A.

I’ll have another couple of items to announce in the very near future (once I’ve received feedback from my field testers) specifically for the Amstrad CPC464/664/128. Keep tuned.

The AY-3-8912-AVR and AY-3-8912A-TS are available from today at https://vretrodesign.com

Back in Business!

Actually came back from my break over a month ago 🙂 Luckily everyone doesn’t rely on these posts to check if products are again available – in fact I’ve been the busiest in a long time.

Have a few new products in the pipeline. The first production of an AY-3-8912 clone (using AVR emulation – same as in the vLA82S+) is about to land. This is designed to work as the orginal part, including IO, and has an additional 3 channels for ‘Turbo Sound’ support as an option.

I’ll talk about the other new items once they’ve passed the prototype stage.

Something for the Zeddy

The vLA81 has a few ‘hidden’ features which can only be fully unlocked with a 32K memory upgrade. If this is present then, as well as the standard 16K memory map, there are three other modes available.

They are all documented in the user manual but in summary they are:

RAM from 0x2000 (8192 dec) to 0x9FFF (40959 dec) – useful for HRG (high resolution graphics)

RAM from 0x4000 (16384 dec) to 0xBFFF (49151 dec) – the standard 32K expansion

RAM from 0x0000 to 0x7FFF (32767 dec) – a special mode which maps the ROM space to RAM

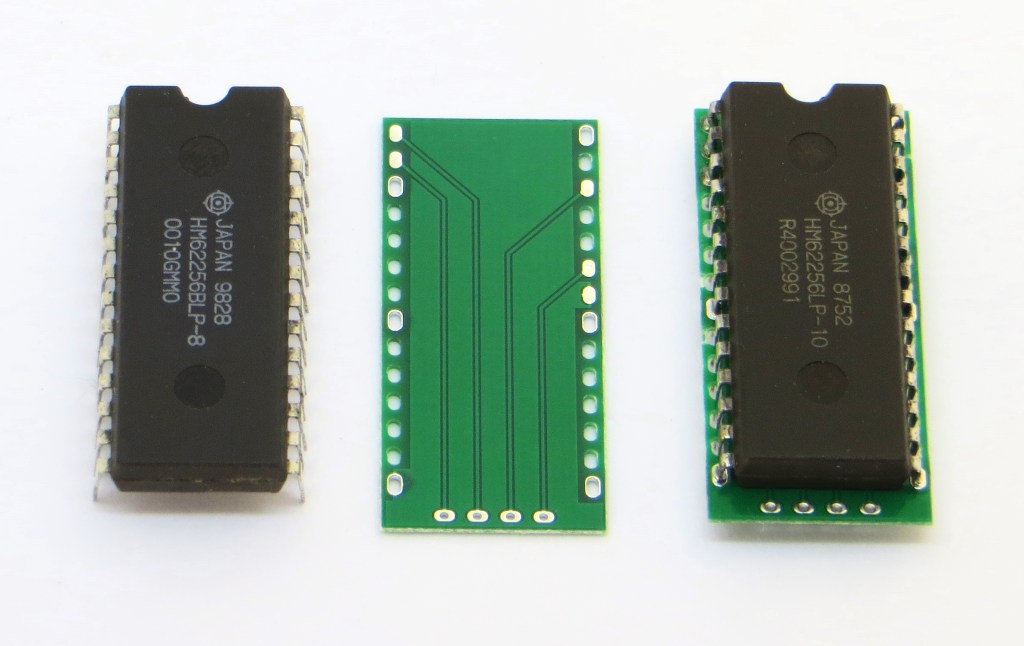
There have been several designs available to upgrade the ZX81 to 32K and I’ve always had the intention to provide a simple, inexpensive, design in kit form or fully built. I finally got around to it and here’s the result:

Couldn’t be simpler!

The design incorporates a thin PCB ‘shim’ between the 32K ram chip and the socket. The PCB does the simple job of rerouting a few pins to the right place and has no active components. Most of the ram chip’s existing pins are left intact. Four address wires are required to be connected to the ZX81 PCB as well as one short jumper under the board to connect A13 to the vLA81.

Available soon at all good vLA81 stockists 🙂

The vLA82 gets an upgrade

Ever wanted RGB quality video from a humble Speccy?

Getting decent a quality video output has always been a must have for most Speccy enthisiasts. From the simple composiste video mod to addons providing HDMI or VGA there is certainly quite a choice.

That’s where the upgraded vLA82 comes in. An RGB interface as well as an AY sound emulator have been shoe-horned into the original 40 pin DIP footprint to provide an upgrade that is simple to do as well cost effective compared to other options providing similar features.

The vLA82S+ (+ for RGB and S for AY sound) is installed in the existing ULA socket and connects to either an external (no Spectrum modification necessary) or an internal interface (replacing the RF modulator).

Units are now available on the vRetro Design online shop as well as occasionally on Sell My Retro.

Please see the vLA82S+ product page for more information.

vDriveQL Firmware Update 004 + MGG ROM support

Firmware release 004 is now available for the vDriveQL

This fixes a small problem with format. Also updated is the user manual which has instructions for troubleshooting the ‘vDrive not responding’ error.

At the request from a few of my German customers I’m providing a special build of the firmware to support the MGG ROM. This enables image formatting which was not supported when the MGG ROM was installed.

Please check out the downloads page for more information.

New Product: QL Power Converter

Been a while but have had a busy year. Amongst the odd projects that I’ve been working on is a power converter for the Sinclair QL. The original power supply is fairly hard to get and its unique power connector means that there hasn’t been an off the shelf alternative – until now.

QL_PSU_model
QL Power Converter

The converter takes a nominal 12V input from a customer supplied power supply (plug pack or other suitable power source with a 2.1mm DC plug) and converts this single voltage into the DC and AC voltages the QL requires. The converter comes with a custom 3D printed case and QL power plug.

Protection is provided with the converter returning to standby if excessive power draw is detected or if the external power supply is of insufficient power rating.

A user guide can be found here

If you want to grab one please check out my new store 🙂

Coming soon will be a similar product for the +2A/B and +3 Spectrum computers.

Enclosures for ZX and QL vDrives

Finally, an enclosure* to go with your vDriveQL or vDriveZX!

No need to dismantle an existing Microdrive for the case, you can now buy a custom 3D printed enclosure designed specifically for the vDriveQL or vDriveZX (there are two case styles to choose from).

Case includes a LED upgrade kit (rectangular LED + resistor). Please check out my new store for the case by itself or bundled with a vDrive and other options.

Acknowledgements: Michele Perini for the original 3D case model

*Note the enclosure is 3D printed and although the visible surface finish has been optimized there are still some minor surface imperfections due to the printing process.

Installation instructions for the QL case can be found here,  and for the ZX case here